
Advanced Studio—Download/Organize/Optimize
Richard Koenig, Professor, Kalamazoo College
Review—Document Your Work
A couple of reminders when shooting your work…
Individual Pieces
- Keep camera steady—use a tripod
- Use a longer focal length—normal to moderate telephoto (40 to 65 mm)
- Set up so that the camera is “square” to the piece
Installation Views
- Keep camera steady—use a tripod
- Use a shorter (wider) focal length (27 to 35 mm)
- Keep camera level so as to minimize distortion of architecture
Download Nikon Camera
Do not use any software for this, just treat camera as portable storage device
- Create a new folder on desktop named “pix”
- Plug camera into iMac using USB cord (found in camera case)
Note: When in FAB LAB you can do this…
Remove the SD card from the camera and put into the side of the computer (I-Mac)
If the camera/SD card shows up on the desktop…
- Double click on the icon and find the files
- Copy them into your new folder (select and drag)
If the camera does not show up…
Use “Image Capture” (which is in the Applications folder) to download the files
In either case……Copy the files into the folder you created
If camera/SD card showed up…dismount it by putting that icon in trash, then pull the SD card out of computer.
If you had to use Image Capture…quit the program and then pull the SD card out of computer
Please remember to put the SD card back in our Nikon camera at this point.
After checking that the image files are safely in the computer…Please delete images in the camera (use menu on camera itself for this)
Back up the files on this computer with a portable drive…
Which all of you should own at this point
Selection
Usually one shoots a lot of images—to make sure one “gets the shot”—so let’s now edit a bit. You can do this in a couple of passes…
- First cut down to “selects”
- To get rid of any multiples
- And then so a further cut down to “heroes”- These will be the ones that you use
Basic Optimization—in Photoshop
Normal stuff
- Rotate—if a vertical shot shows up horizontal, for example
- Crop/Straighten- Same tool in Photoshop Density
- Light/dark – Levels, Curves, or Exposure contrast
- Color Balance
- Dodge and Burn
- Retouch
Save these optimized images PSDs
- Changing the format (to PSD) will rename (and therefore copy) the file
- Put these new files in a new/different folder marked “heroes”
- You will save as a JPG after we size for the web
Advanced corrections and embellishments
- Selection—for selective color, for example
- Square a painting that is skewed
- Fake gallery shot with drop shadow
For more advanced actions, please ask me for a handout I have called “more on optimization”.
Resize for Web or PowerPoint
Look at the all-important “image size” dialogue box (notice difference in these two pictures)…
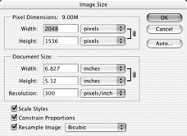
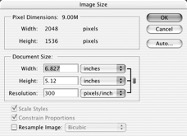
It’s a zero-sum game when “resample image” is NOT clicked…
One can squeeze a given amount of pixel information into a smaller image (h x w)…
…thus raising the pixels-per-inch number
On the other hand, if one tries to enlarge an image (h x w)…
…the PPI number will go down
And one has to be careful not to throw away information if it is clicked (when making an image smaller for instance)
Recommended PPI for Various Uses…
For printing… images are sized at 300 dpi (around 7.5” high by 10” wide) For PowerPoint… images are sized at 150 dpi (around 7” high by 9” wide) For web… images are sized at 72 dpi (around 7” high by 9” wide)
Save Again
Now save in JPG format—these are used for dissemination or one kind or another