
For Advanced Studio—Documentation of Your Work, Richard Koenig, Professor Kalamazoo College
Document your work
It is important that you get in the habit of documenting your artwork as you go along. Artwork has a way of getting damaged, misplaced, or otherwise lost for eternity. Having—at the very least—a solid record of the creative work you do will be important for you as an artist.
With this document I will cover the basics of how to shoot your work. We will look at photography of both two-dimensional and three-dimensional artwork as well as installation views. The point here is to get clean and technically sound photographs of your studio work. These may be used to solicit exhibits, but may also simply chart your growth as an artist. The methods here will utilize a simple digital camera.
Later, you might want to take the time to optimize these images—to upload to on-line portfolio sites or send to galleries and such. You can even make prints and put in a simple portfolio case. As you meet people in the field you can whip out your “book” and show them what you do.
Shoot your pieces individually
You should document all of your finished pieces as a comprehensive record of your work. You can do this either in the gallery (while your work is on display) or in the studio (or similar space).
With small, two-dimensional pieces, you might simply use a scanner. For larger pieces use a simple digital camera to document the piece. Pin to a wall in a classroom—ideally FA103 so you can use a couple of studio lights. If you do not have access to this room, find a place that it is lit with even, soft light. Almost any type of light will do—as long as it is not an assortment of different types of light (in terms of color temperature). Cameras are very good these days at automatically setting the white balance (when your white balance is set to “auto”) but one must still try to avoid mixing light sources (which can have different color cast).
If you are using the photography classroom (or PTC), place two of the Smith-Victor incandescent lights (non-halogen) to either side of the piece. Use a shallow angle with these lights so they don’t reflect off of the piece and into the camera lens. See the overhead view below…
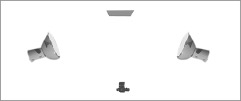
Bulbs vary in terms of brightness (due to hours of use, or age), so just putting the two lights an equal distance from the subject won’t necessarily make the two lights of equal intensity. To check this, place a pushpin on the shooting surface and look at the shadows created by the lights. If one shadow is darker
than the other, move one of the lights back or forth to equalize the density of the shadows. Remember to turn off the room lights so you’re not mixing those florescent ones with your studio lights.
If possible, use a tripod or camera stand to hold the camera steady when shooting. It’s very important to make sure the camera is square to the piece. See if you can find a position where the camera is pointed directly perpendicular to the piece. (Look for a keystone effect inside the viewfinder—then move the camera side to side until the piece appears truly square.) Generally speaking, for copy work, use a longer focal length. Put your zoom at the “normal” range or just a bit longer as this will help to square up your image.
If you’re not using the studio set up, make sure your piece is lit evenly, square your camera to the piece, and use a tripod to steady the camera if possible.
You can use the “program” setting when you shoot—this is a bit smarter than the “auto” one. Depending upon your camera, this “P” setting should automatically turn off the flash and such. The camera will then set the proper exposure for your photograph.
In the studio: working in three-dimensions
We simply expand our copy work into three-dimensions here to photograph sculpture, ceramics, and any other work with physical depth.
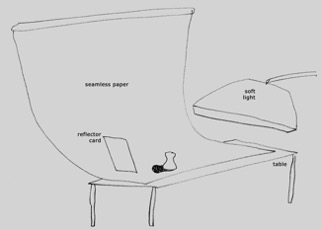
Use a fairly plain background to allow the work to stand out—I like gray seamless paper as most things stand out from that. White seamless paper can give a clean, clinical look and black can be very dramatic—but I would only use these two latter paper selections if they contribute to the meaning of the work. Generally speaking, one should avoid dramatic shooting and lighting (expressive) at this point to allow your work to show through directly and clearly.
With three-dimensional work, things are much more case-by-case than with flat work. One must really take some time and experiment with light and shadow to best find a scheme for a given kind of work. I
tend to use soft, three-quarter light to show the volume of three-dimensional work. To get this diffuse, yet directional light—you can use the soft box in FA103.
In any case, don’t over-light when you are creating these record images. Start with one light, and then maybe add one for fill—if not simply a reflector card for shadow detail on dark side of object. Do not simply turn on every light in the studio to shoot your work. Keep it simple—you want to show your work, not some overdone “creative” picture of your work.
With three-dimensional work, I suggest that you use a small aperture (big number, such as f11 or f16) so that you achieve better depth of field (focus). This small aperture will give you a slower time as a result, so always put the camera on a tripod for this kind of work, and make your exposures using either a self- timer or cable release—so that you won’t jar the camera while shooting. Camera shake is the single most common problem with novice shooters
Installation views
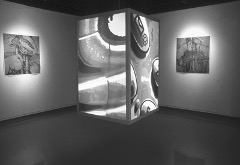
When you have a show, you will want to get a good record of it. Installation views are valuable for showing the scale of your work and its presence under gallery lighting. For best results, photograph the space—with the work located and lit within it.
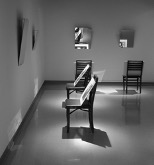
Before you begin shooting, turn the flash of your camera off when you do these installation views. (I also never use camera flash for flat work.) You want to see the gallery and work lit as a visitor would—not illuminated by the electronic flash on your camera.
I use a fairly wide focal length to take in the space and get a feel for the room and artwork. If you have a zoom lens, put it on a setting of about 20mm. To eliminate distortion with a wide-angle lens, keep the camera level to the floor. Again, you might want to leave your camera’s white balance set on “auto” as it should do a good job at sensing the color temperature of the light and compensating properly for it.
As with 3D work (above), use a small aperture (f11 or f16) so that you can pull focus on your subject. Again, the small aperture will give you a slower time as a result, so put the camera on a tripod for this kind of work, and make your exposures using either a self-timer or cable release.